はじめに
JavaScript と <canvas> タグを組み合わせることで、HTML 上で動的な2D/3Dグラフィックスを描画・操作できます。
これからグラフィカルなデザインに挑戦してみたい!という方に向けて実装のサンプルをご用意しました!
まずはじめにJavaScript と <canvas> タグでできることを簡潔にまとめました。
🎨 2Dグラフィックス
| 機能 | 説明 |
|---|---|
| 図形描画 | 線、円、矩形、多角形などを描画可能 |
| 画像描画 | 画像を表示・拡大縮小・トリミング・回転できる |
| アニメーション | requestAnimationFrame() を使って滑らかな動きの表現が可能 |
| エフェクト | ノイズ、ぼかし、グリッチなど視覚演出が可能 |
| パーティクル | 粒子を使った演出(火花、煙、星など)も可能 |
| インタラクション | マウス・タッチ操作に反応して動くUIや演出が作れる |
🧊 3Dグラフィックス(WebGL)
<canvas>で WebGL(JavaScriptで3D描画)を使えば、- 3Dモデル表示
- ライト・シャドウ
- カメラ視点移動
- ゲームやVRコンテンツの実装も可能
JavaScriptとcanvasタグを使用することで様々なデザインを実装することができます。
ただ、イメージが湧かない方も多いと思いますのでサンプルコード付きで実装例をご紹介していきます。
サンプル一覧
サンプルをいくつかご用意しました。
コピペですぐに確認できるようにするためhtml, css, JavaScriptは分けておりません。
htmlファイルをご用意頂き、そのままコピーして頂くとローカル環境で確認できます!
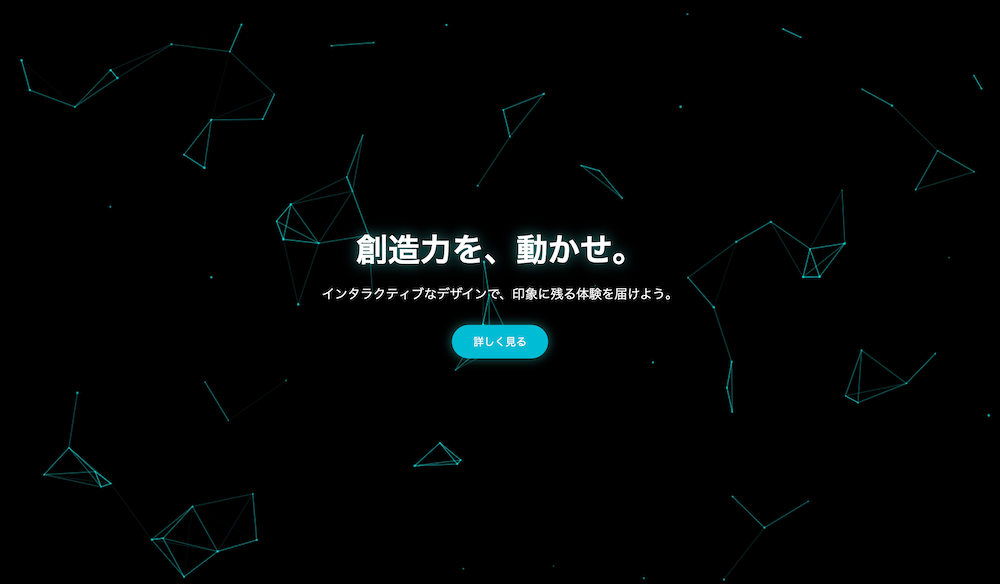
直感的にテクロノジーなイメージを与えるサンプル
直感的にテクロノジーなイメージを与えるようなデザインを作成してみました。
是非カーソルを動かしてみてください!
<!DOCTYPE html>
<html lang="ja">
<head>
<meta charset="UTF-8">
<title>直感的にテクノロジーなイメージを与えるサンプル</title>
<style>
* { margin: 0; padding: 0; box-sizing: border-box; }
html, body {
height: 100%;
overflow: hidden;
background: #000;
font-family: 'Segoe UI', sans-serif;
}
canvas {
position: absolute;
top: 0;
left: 0;
width: 100vw;
height: 100vh;
display: block;
z-index: 0;
}
.hero-content {
position: relative;
z-index: 1;
height: 100%;
display: flex;
flex-direction: column;
justify-content: center;
align-items: center;
color: #fff;
text-align: center;
padding: 1rem;
}
.hero-content h1 {
font-size: 3rem;
margin-bottom: 1rem;
text-shadow: 0 0 20px rgba(0,255,255,0.6);
}
.hero-content p {
font-size: 1.2rem;
margin-bottom: 2rem;
max-width: 600px;
}
.hero-content button {
padding: 0.8rem 2rem;
font-size: 1rem;
background: #00bcd4;
color: white;
border: none;
border-radius: 50px;
cursor: pointer;
transition: background 0.3s ease, transform 0.3s ease;
box-shadow: 0 0 15px rgba(0,255,255,0.5);
}
.hero-content button:hover {
background: #008ba3;
transform: scale(1.05);
}
</style>
</head>
<body>
<canvas id="canvas"></canvas>
<div class="hero-content">
<h1>創造力を、動かせ。</h1>
<p>インタラクティブなデザインで、印象に残る体験を届けよう。</p>
<button>詳しく見る</button>
</div>
<script>
const canvas = document.getElementById('canvas');
const ctx = canvas.getContext('2d');
canvas.width = window.innerWidth;
canvas.height = window.innerHeight;
const mouse = {
x: null,
y: null,
radius: 120
};
window.addEventListener('mousemove', (e) => {
mouse.x = e.x;
mouse.y = e.y;
});
window.addEventListener('resize', () => {
canvas.width = window.innerWidth;
canvas.height = window.innerHeight;
init();
});
class Particle {
constructor(x, y, dx, dy, size) {
this.x = x;
this.y = y;
this.dx = dx;
this.dy = dy;
this.size = size;
this.baseX = x;
this.baseY = y;
}
draw() {
ctx.beginPath();
ctx.arc(this.x, this.y, this.size, 0, Math.PI * 2);
const grad = ctx.createRadialGradient(this.x, this.y, 0, this.x, this.y, this.size);
grad.addColorStop(0, 'rgba(0,255,255,1)');
grad.addColorStop(1, 'rgba(0,255,255,0)');
ctx.fillStyle = grad;
ctx.fill();
}
update() {
const dx = mouse.x - this.x;
const dy = mouse.y - this.y;
const distance = Math.sqrt(dx * dx + dy * dy);
if (distance < mouse.radius) {
const angle = Math.atan2(dy, dx);
const force = (mouse.radius - distance) / mouse.radius;
this.x -= Math.cos(angle) * force * 5;
this.y -= Math.sin(angle) * force * 5;
} else {
// 戻る動き
const dx = this.x - this.baseX;
const dy = this.y - this.baseY;
this.x -= dx * 0.05;
this.y -= dy * 0.05;
}
this.draw();
}
}
let particlesArray;
function init() {
particlesArray = [];
const density = 100;
for (let i = 0; i < density; i++) {
const x = Math.random() * canvas.width;
const y = Math.random() * canvas.height;
const dx = (Math.random() - 0.5) * 2;
const dy = (Math.random() - 0.5) * 2;
const size = Math.random() * 2 + 1;
particlesArray.push(new Particle(x, y, dx, dy, size));
}
}
function connectParticles() {
for (let a = 0; a < particlesArray.length; a++) {
for (let b = a + 1; b < particlesArray.length; b++) {
const dx = particlesArray[a].x - particlesArray[b].x;
const dy = particlesArray[a].y - particlesArray[b].y;
const distance = dx * dx + dy * dy;
if (distance < 12000) {
const opacity = 1 - distance / 12000;
ctx.strokeStyle = `rgba(0,255,255,${opacity})`;
ctx.lineWidth = 1;
ctx.beginPath();
ctx.moveTo(particlesArray[a].x, particlesArray[a].y);
ctx.lineTo(particlesArray[b].x, particlesArray[b].y);
ctx.stroke();
}
}
}
}
function animate() {
ctx.clearRect(0, 0, canvas.width, canvas.height);
particlesArray.forEach(p => p.update());
connectParticles();
requestAnimationFrame(animate);
}
init();
animate();
</script>
</body>
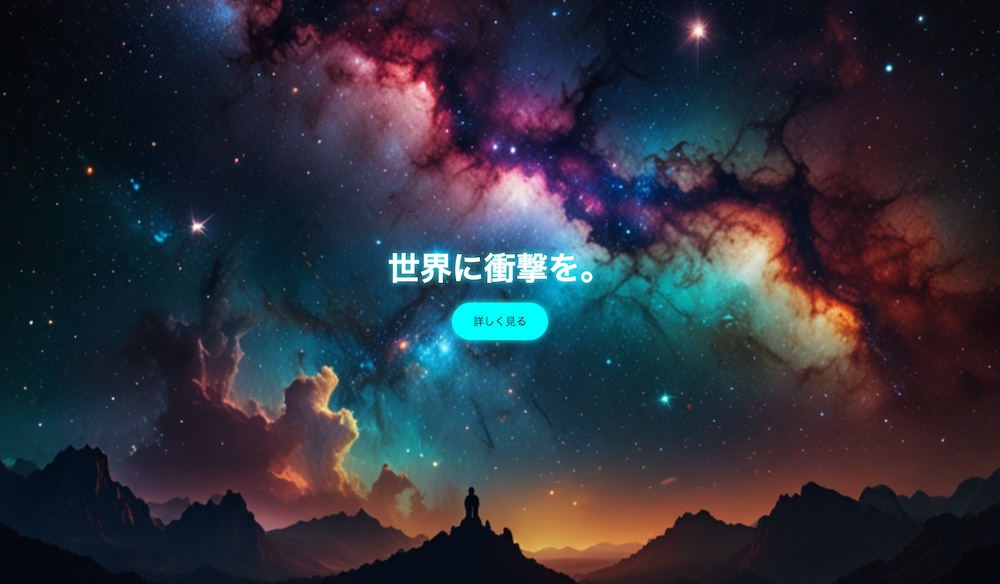
</html>バグを連想させるような定期時間で画像を歪ませる(グリッジ)サンプル
映画での演出やコンピューターのバグを連想させるようなバグのような見た目を実装してみました!
63行目の[img.src = ‘image.jpg’; ]に使用する画像を設定してください。
画像では伝わりづらいので是非サンプルページをご覧ください!
<!DOCTYPE html>
<html lang="ja">
<head>
  <meta charset="UTF-8">
  <title>バグを連想させるような定期時間で画像を歪ませる(グリッジ)サンプル</title>
  <style>
    * { margin: 0; padding: 0; box-sizing: border-box; }
    html, body {
      height: 100%;
      background: #000;
      overflow: hidden;
      font-family: 'Segoe UI', sans-serif;
    }
    canvas {
      position: absolute;
      top: 0; left: 0;
      width: 100vw;
      height: 100vh;
      display: block;
      z-index: 0;
    }
    .hero-content {
      position: relative;
      z-index: 1;
      height: 100%;
      display: flex;
      justify-content: center;
      align-items: center;
      flex-direction: column;
      color: white;
      text-align: center;
    }
    h1 {
      font-size: 3rem;
      text-shadow: 0 0 10px #0ff;
    }
    button {
      margin-top: 1rem;
      padding: 1rem 2rem;
      background: #0ff;
      border: none;
      border-radius: 30px;
      font-size: 1rem;
      cursor: pointer;
      box-shadow: 0 0 10px #0ff;
    }
  </style>
</head>
<body>

<canvas id="glitchCanvas"></canvas>

<div class="hero-content">
  <h1>世界に衝撃を。</h1>
  <button>詳しく見る</button>
</div>

<script>
  const canvas = document.getElementById('glitchCanvas');
  const ctx = canvas.getContext('2d');
  let w, h;
  let img = new Image();
  img.src = 'image.jpg'; // ここに任意の画像パスを入れてください

  function resizeCanvas() {
    w = canvas.width = window.innerWidth;
    h = canvas.height = window.innerHeight;
  }
  window.addEventListener('resize', resizeCanvas);
  resizeCanvas();

  img.onload = function () {
    draw();
  };

  function drawGlitch() {
    const sliceHeight = 5;
    for (let y = 0; y < h; y += sliceHeight) {
      const dx = (Math.random() - 0.5) * 20;
      ctx.drawImage(canvas, 0, y, w, sliceHeight, dx, y, w, sliceHeight);
    }
  }

  function draw() {
  const canvasAspect = w / h;
  const imgAspect = img.width / img.height;

  let sx, sy, sWidth, sHeight;

  if (canvasAspect > imgAspect) {
    // キャンバスの方が横長 → 画像の高さを合わせて横を切る
    sWidth = img.width;
    sHeight = img.width / canvasAspect;
    sx = 0;
    sy = (img.height - sHeight) / 2;
  } else {
    // キャンバスの方が縦長 → 画像の幅を合わせて縦を切る
    sHeight = img.height;
    sWidth = img.height * canvasAspect;
    sy = 0;
    sx = (img.width - sWidth) / 2;
  }

  ctx.clearRect(0, 0, w, h);
  ctx.drawImage(img, sx, sy, sWidth, sHeight, 0, 0, w, h);

  if (Math.random() < 0.2) {
    drawGlitch();
  }

  requestAnimationFrame(draw);
}

</script>
</body>
</html>
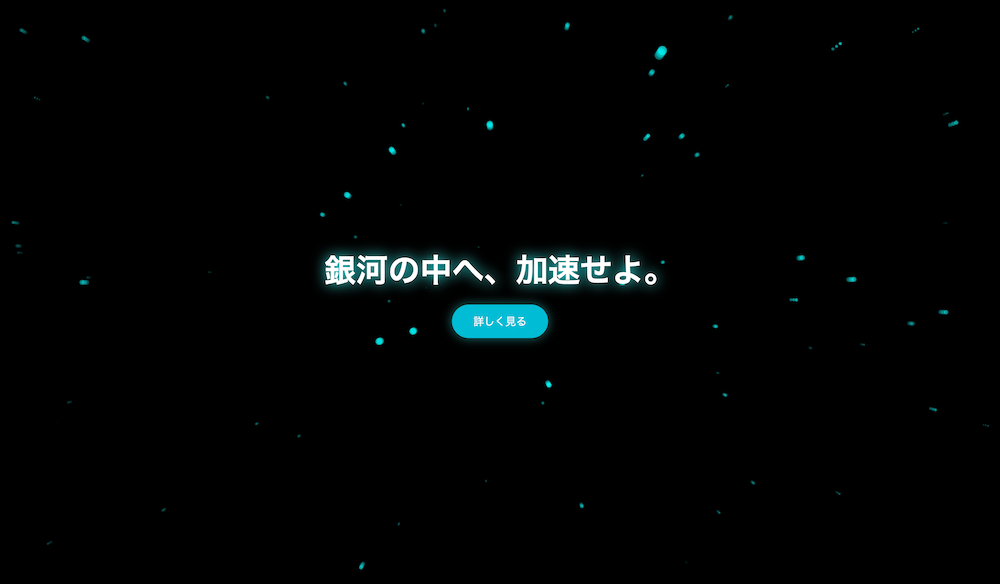
銀河アニメーションサンプル
銀河をイメージしたサンプルになります。
奥行きを感じられ、見るのが楽しいデザインです!
こちらも画像では伝わりづらいので是非サンプルページをご覧ください!
<!DOCTYPE html>
<html lang="ja">
<head>
  <meta charset="UTF-8">
  <title>銀河アニメーション</title>
  <style>
    * { margin: 0; padding: 0; box-sizing: border-box; }

    html, body {
      height: 100%;
      overflow: hidden;
      background: #000;
      font-family: 'Segoe UI', sans-serif;
    }

    canvas {
      position: absolute;
      top: 0;
      left: 0;
      display: block;
      width: 100vw;
      height: 100vh;
      z-index: 0;
    }

    .hero-content {
      position: relative;
      z-index: 1;
      height: 100%;
      display: flex;
      flex-direction: column;
      justify-content: center;
      align-items: center;
      color: #fff;
      text-align: center;
      padding: 1rem;
    }

    .hero-content h1 {
      font-size: 3rem;
      margin-bottom: 1rem;
      text-shadow: 0 0 20px #0ff;
    }

    .hero-content button {
      padding: 0.8rem 2rem;
      font-size: 1rem;
      background: #00bcd4;
      color: white;
      border: none;
      border-radius: 50px;
      cursor: pointer;
      transition: background 0.3s ease, transform 0.3s ease;
      box-shadow: 0 0 15px rgba(0,255,255,0.5);
    }

    .hero-content button:hover {
      background: #008ba3;
      transform: scale(1.05);
    }
  </style>
</head>
<body>

<canvas id="galaxy"></canvas>

<div class="hero-content">
  <h1>銀河の中へ、加速せよ。</h1>
  <button>詳しく見る</button>
</div>

<script>
  const canvas = document.getElementById('galaxy');
  const ctx = canvas.getContext('2d');
  let stars = [];
  const starCount = 400;
  let w, h;

  function resizeCanvas() {
    w = canvas.width = window.innerWidth;
    h = canvas.height = window.innerHeight;
  }

  window.addEventListener('resize', resizeCanvas);
  resizeCanvas();

  class Star {
    constructor() {
      this.reset();
    }

    reset() {
      this.x = (Math.random() - 0.5) * w;
      this.y = (Math.random() - 0.5) * h;
      this.z = Math.random() * w;
      this.size = Math.random() * 1.5 + 0.5;
    }

    update() {
      this.z -= 4;
      if (this.z <= 0) this.reset();
    }

    draw() {
      const scale = w / this.z;
      const x = this.x * scale + w / 2;
      const y = this.y * scale + h / 2;

      if (x < 0 || x >= w || y < 0 || y >= h) return;

      const brightness = 1 - this.z / w;
      ctx.beginPath();
      ctx.arc(x, y, this.size * scale, 0, Math.PI * 2);
      ctx.fillStyle = `rgba(0,255,255,${brightness})`;
      ctx.fill();
    }
  }

  function initStars() {
    stars = [];
    for (let i = 0; i < starCount; i++) {
      stars.push(new Star());
    }
  }

  function animate() {
    ctx.fillStyle = 'rgba(0, 0, 0, 0.2)';
    ctx.fillRect(0, 0, w, h);

    stars.forEach(star => {
      star.update();
      star.draw();
    });

    requestAnimationFrame(animate);
  }

  initStars();
  animate();
</script>

</body>
</html>
最後に
いかがでしたでしょうか?動画を使用しなくても複雑なアニメーションを実装できたり、3Dモデルをマウスの動きと連動させたりすることができるのでWEB上でゲームの開発なども行えます。一般的なWEBサイトでは活用することがあまり多くはないかもしれませんが、業種や事業によっては強みとなるデザインを作成することができるのでエンドユーザーに強いインパクトを与えることができる技術なのかなと思います。
是非本記事を活用して頂き皆様のお役に立てると幸いです。
当サイト(WEBDARA)ではホームページやWEBサイトの制作に何十万円も払えない・・・。といった方へ向けて制作費用0円、月額9800円と低コストでホームページを制作しています。もし、プロのサポートを受けたい、どんな事業者がいいのか分からないという方は是非一度ご相談ください!